Install IPEX-LLM on Windows with Intel GPU#
This guide demonstrates how to install IPEX-LLM on Windows with Intel GPUs.
It applies to Intel Core Ultra and Core 12 - 14 gen integrated GPUs (iGPUs), as well as Intel Arc Series GPU.
Install Prerequisites#
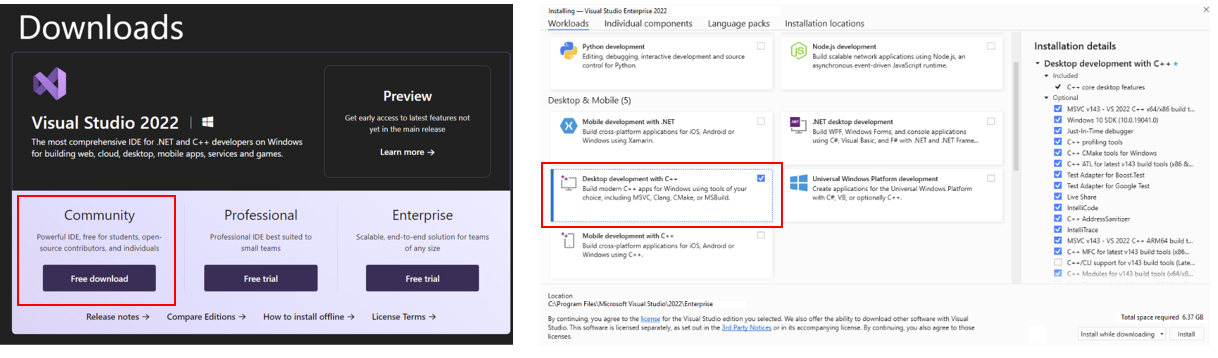
Install Visual Studio 2022#
Download and Install Visual Studio 2022 Community Edition from the official Microsoft Visual Studio website. Ensure you select the Desktop development with C++ workload during the installation process.
Tip
The installation could take around 15 minutes, and requires at least 7GB of free disk space. If you accidentally skip adding the Desktop development with C++ workload during the initial setup, you can add it afterward by navigating to Tools > Get Tools and Features…. Follow the instructions on this Microsoft guide to update your installation.
Install GPU Driver#
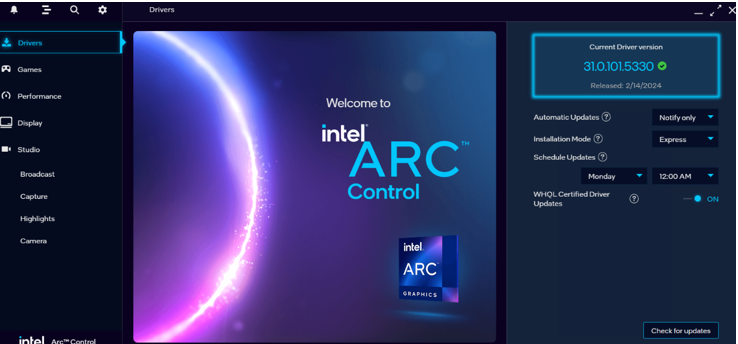
Download and install the latest GPU driver from the official Intel download page. A system reboot is necessary to apply the changes after the installation is complete.
Note
The process could take around 10 minutes. After reboot, check for the Intel Arc Control application to verify the driver has been installed correctly. If the installation was successful, you should see the Arc Control interface similar to the figure below
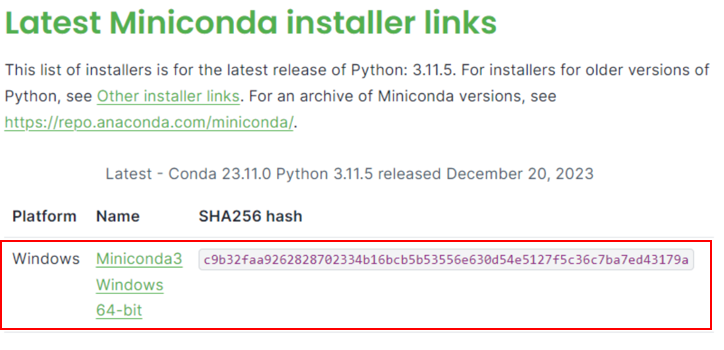
Install Miniconda#
Visit Miniconda installation page, download the Miniconda installer for Windows, and follow the instructions to complete the installation.
Install oneAPI#
Open the Anaconda Prompt. Then create a new python environment llm and activate it:
conda create -n llm python=3.11 libuv
conda activate llm
Use pip to install the Intel oneAPI Base Toolkit 2024.0:
pip install dpcpp-cpp-rt==2024.0.2 mkl-dpcpp==2024.0.0 onednn==2024.0.0
Install ipex-llm#
With the llm environment active, use pip to install ipex-llm for GPU:
Choose either US or CN website for extra-index-url:
pip install --pre --upgrade ipex-llm[xpu] --extra-index-url https://pytorch-extension.intel.com/release-whl/stable/xpu/us/
pip install --pre --upgrade ipex-llm[xpu] --extra-index-url https://pytorch-extension.intel.com/release-whl/stable/xpu/cn/
Note
If you encounter network issues while installing IPEX, refer to this guide for troubleshooting advice.
Verify Installation#
You can verify if ipex-llm is successfully installed following below steps.
Step 1: Runtime Configurations#
Open the Anaconda Prompt and activate the Python environment
llmyou previously created:conda activate llm
Set the following environment variables according to your device:
set SYCL_CACHE_PERSISTENT=1
set BIGDL_LLM_XMX_DISABLED=1
set SYCL_CACHE_PERSISTENT=1
See also
For other Intel dGPU Series, please refer to this guide for more details regarding runtime configuration.
Step 2: Run Python Code#
Launch the Python interactive shell by typing
pythonin the Anaconda prompt window and then press Enter.Copy following code to Anaconda prompt line by line and press Enter after copying each line.
import torch
from ipex_llm.transformers import AutoModel,AutoModelForCausalLM
tensor_1 = torch.randn(1, 1, 40, 128).to('xpu')
tensor_2 = torch.randn(1, 1, 128, 40).to('xpu')
print(torch.matmul(tensor_1, tensor_2).size())
It will output following content at the end:
torch.Size([1, 1, 40, 40])
See also
If you encounter any problem, please refer to here for help.
To exit the Python interactive shell, simply press Ctrl+Z then press Enter (or input
exit()then press Enter).
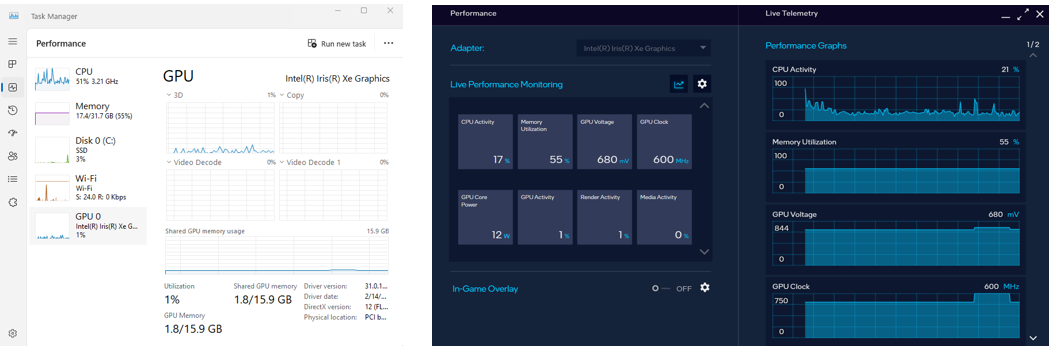
Monitor GPU Status#
To monitor your GPU’s performance and status (e.g. memory consumption, utilization, etc.), you can use either the Windows Task Manager (in Performance Tab) (see the left side of the figure below) or the Arc Control application (see the right side of the figure below)
A Quick Example#
Now let’s play with a real LLM. We’ll be using the Qwen-1.8B-Chat model, a 1.8 billion parameter LLM for this demonstration. Follow the steps below to setup and run the model, and observe how it responds to a prompt “What is AI?”.
Step 1: Follow Runtime Configurations Section above to prepare your runtime environment.
Step 2: Install additional package required for Qwen-1.8B-Chat to conduct:
pip install tiktoken transformers_stream_generator einops
Step 3: Create code file. IPEX-LLM supports loading model from Hugging Face or ModelScope. Please choose according to your requirements.
Create a new file named
demo.pyand insert the code snippet below to run Qwen-1.8B-Chat model with IPEX-LLM optimizations.# Copy/Paste the contents to a new file demo.py import torch from ipex_llm.transformers import AutoModelForCausalLM from transformers import AutoTokenizer, GenerationConfig generation_config = GenerationConfig(use_cache=True) print('Now start loading Tokenizer and optimizing Model...') tokenizer = AutoTokenizer.from_pretrained("Qwen/Qwen-1_8B-Chat", trust_remote_code=True) # Load Model using ipex-llm and load it to GPU model = AutoModelForCausalLM.from_pretrained("Qwen/Qwen-1_8B-Chat", load_in_4bit=True, cpu_embedding=True, trust_remote_code=True) model = model.to('xpu') print('Successfully loaded Tokenizer and optimized Model!') # Format the prompt question = "What is AI?" prompt = "user: {prompt}\n\nassistant:".format(prompt=question) # Generate predicted tokens with torch.inference_mode(): input_ids = tokenizer.encode(prompt, return_tensors="pt").to('xpu') print('--------------------------------------Note-----------------------------------------') print('| For the first time that each model runs on Intel iGPU/Intel Arc™ A300-Series or |') print('| Pro A60, it may take several minutes for GPU kernels to compile and initialize. |') print('| Please be patient until it finishes warm-up... |') print('-----------------------------------------------------------------------------------') # To achieve optimal and consistent performance, we recommend a one-time warm-up by running `model.generate(...)` an additional time before starting your actual generation tasks. # If you're developing an application, you can incorporate this warm-up step into start-up or loading routine to enhance the user experience. output = model.generate(input_ids, do_sample=False, max_new_tokens=32, generation_config=generation_config) # warm-up print('Successfully finished warm-up, now start generation...') output = model.generate(input_ids, do_sample=False, max_new_tokens=32, generation_config=generation_config).cpu() output_str = tokenizer.decode(output[0], skip_special_tokens=True) print(output_str)
Please first run following command in Anaconda Prompt to install ModelScope:
pip install modelscope==1.11.0
Create a new file named
demo.pyand insert the code snippet below to run Qwen-1.8B-Chat model with IPEX-LLM optimizations.# Copy/Paste the contents to a new file demo.py import torch from ipex_llm.transformers import AutoModelForCausalLM from transformers import GenerationConfig from modelscope import AutoTokenizer generation_config = GenerationConfig(use_cache=True) print('Now start loading Tokenizer and optimizing Model...') tokenizer = AutoTokenizer.from_pretrained("Qwen/Qwen-1_8B-Chat", trust_remote_code=True) # Load Model using ipex-llm and load it to GPU model = AutoModelForCausalLM.from_pretrained("Qwen/Qwen-1_8B-Chat", load_in_4bit=True, cpu_embedding=True, trust_remote_code=True, model_hub='modelscope') model = model.to('xpu') print('Successfully loaded Tokenizer and optimized Model!') # Format the prompt question = "What is AI?" prompt = "user: {prompt}\n\nassistant:".format(prompt=question) # Generate predicted tokens with torch.inference_mode(): input_ids = tokenizer.encode(prompt, return_tensors="pt").to('xpu') print('--------------------------------------Note-----------------------------------------') print('| For the first time that each model runs on Intel iGPU/Intel Arc™ A300-Series or |') print('| Pro A60, it may take several minutes for GPU kernels to compile and initialize. |') print('| Please be patient until it finishes warm-up... |') print('-----------------------------------------------------------------------------------') # To achieve optimal and consistent performance, we recommend a one-time warm-up by running `model.generate(...)` an additional time before starting your actual generation tasks. # If you're developing an application, you can incorporate this warm-up step into start-up or loading routine to enhance the user experience. output = model.generate(input_ids, do_sample=False, max_new_tokens=32, generation_config=generation_config) # warm-up print('Successfully finished warm-up, now start generation...') output = model.generate(input_ids, do_sample=False, max_new_tokens=32, generation_config=generation_config).cpu() output_str = tokenizer.decode(output[0], skip_special_tokens=True) print(output_str)
Tip
Please note that the repo id on ModelScope may be different from Hugging Face for some models.
Note
When running LLMs on Intel iGPUs with limited memory size, we recommend setting
cpu_embedding=Truein thefrom_pretrainedfunction. This will allow the memory-intensive embedding layer to utilize the CPU instead of GPU.Step 4. Run
demo.pywithin the activated Python environment using the following command:python demo.py
Example output#
Example output on a system equipped with an Intel Core Ultra 5 125H CPU and Intel Arc Graphics iGPU:
user: What is AI?

assistant: AI stands for Artificial Intelligence, which refers to the development of computer systems that can perform tasks that typically require human intelligence, such as visual perception, speech recognition,
Tips & Troubleshooting#
Warm-up for optimal performance on first run#
When running LLMs on GPU for the first time, you might notice the performance is lower than expected, with delays up to several minutes before the first token is generated. This delay occurs because the GPU kernels require compilation and initialization, which varies across different GPU types. To achieve optimal and consistent performance, we recommend a one-time warm-up by running model.generate(...) an additional time before starting your actual generation tasks. If you’re developing an application, you can incorporate this warm-up step into start-up or loading routine to enhance the user experience.